Welcome to Protect My Ministry!
This help sheet will show you how to link your existing Protect My Ministry (PMM) account to your Servant Keeper 8 program for background checks. To begin, make sure you have access to the email you received after signing up with PMM. Don't already have a Protect My Ministry account? Click HERE to learn more.
- Open and log in to the Servant Keeper 8 Membership Manager.
- Choose Tools | Background Check Manager.
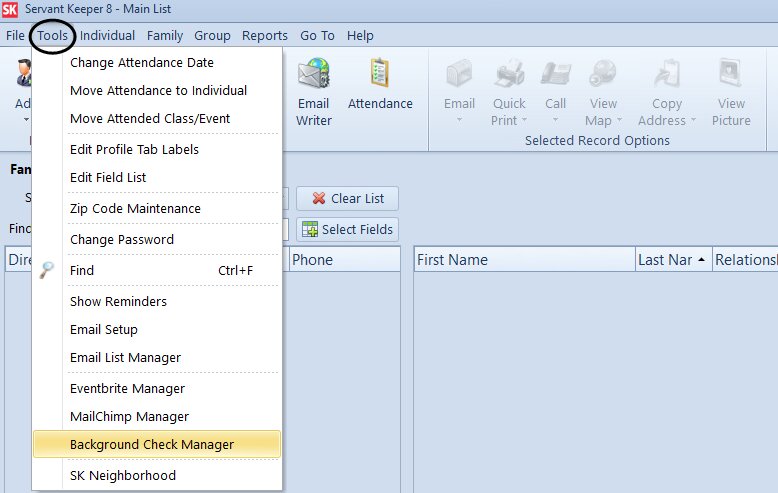
NOTE: If the Background Check Manager option is grayed out, you will want to have your administrator update your User Security in the Administration Manager. After the User Security has been updated, remember to close and re-open the program for the new permissions to take effect.
- On the window that opens, choose "Integrate with Protect My Ministry", then click [Continue].
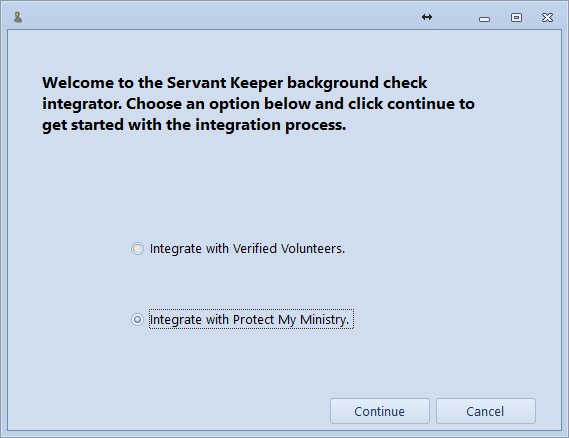
- On the next window, choose [Enter Settings], then click [Continue].
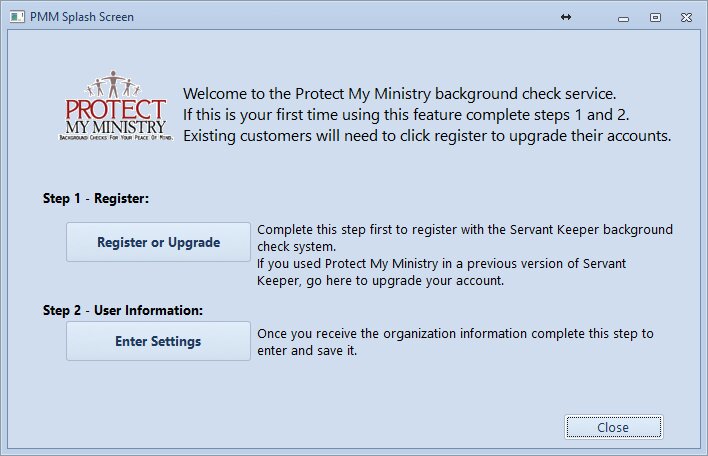
NOTE: If you haven't already signed up for Protect My Ministry, choose [Register or Upgrade]. After completing the registration and receiving the email from PMM with your account information, go back to the beginning of this guide and follow the steps to set up your integration.
IMPORTANT NOTE FOR EXISTING PMM USERS: If you already have a Protect My Ministry account you've used with an older version of Servant Keeper (SK6 or SK7), you will need to upgrade your Protect My Ministry account in order to use it with SK8. Use the [Register or Upgrade] button to complete the registration form. Check the "Current Customer" box at the bottom of the registration form to indicate you are currently a PMM customer. After completing the registration and receiving the email from PMM with your updated account information, go back to the beginning of this guide and follow the steps to set up your integration.
- On the Servant Keeper PMM Background Check Settings window:
- Enter your Servant Keeper Customer ID number in the "Servant Keeper Customer ID" field.
- Enter your Protect My Ministry Username and Password in the respective "Username" and "Password" fields. (This information would be in the email you received after signing up with PMM.)
- In the "Email Address Used" area, select the email address on the SK Individual Profile to which you would like to send your PMM e-invite background check requests. By default, the selection will be on "E-Mail" (the primary E-Mail field on the SK Individual Profile).
- Choose whether or not you'd like to log background checks as Touch Points by turning the "Track interactions as Touch Points" toggle on or off. By default, the toggle is "on", meaning any background checks you complete will be tracked under the Overview > Touch Points tab of the volunteer's SK Individual Profile.
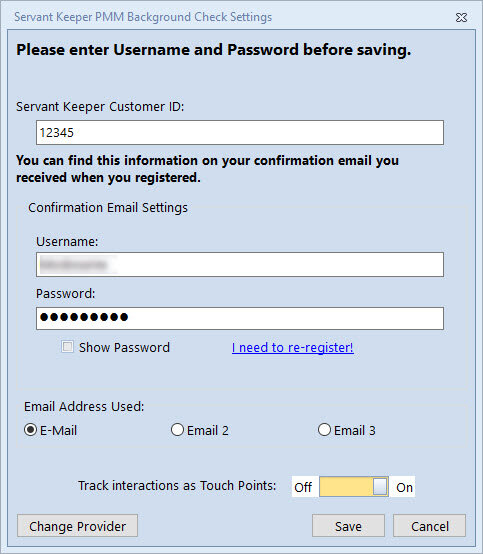
- Click [Save] to save your settings.
- You will now see the Background Check Manager. Your settings to connect Servant Keeper with Protect My Ministry have been saved and you're ready to begin your background checks!
Click here for help Submitting a Background Check (using Protect My Ministry).